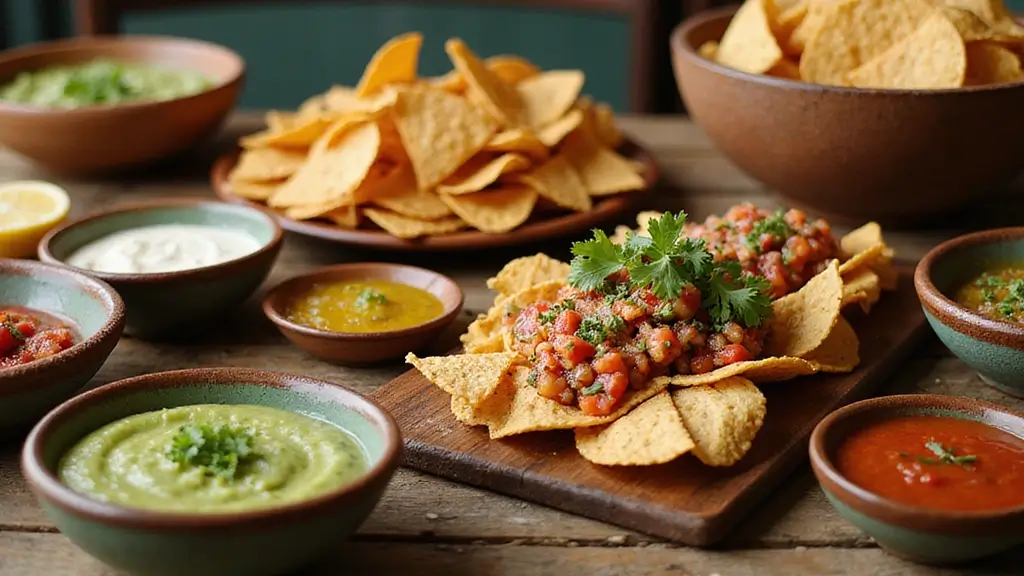
Are you gearing up for a party and feeling that familiar craving for something delicious? If you love hosting and want to impress your guests without spending hours in the kitchen, you’re in the right place. I created this post to help you find the perfect starter recipes that pack a punch.
Whether you’re planning a casual gathering with friends or a festive celebration, having a variety of appetizers is key. If you’re someone who enjoys the vibrant flavors of Mexican cuisine, you’re bound to find something here that excites your taste buds. From savory dips to crispy bites, these recipes cater to everyone, whether you’re a seasoned chef or a kitchen newbie.
In this post, you’ll discover 29 easy Mexican appetizer recipes that are tasty and fun. Each recipe is designed to be straightforward, so you can focus on enjoying your time with loved ones. With these appetizers, you’ll not only keep your guests happy but also create an inviting atmosphere filled with the lively spirit of Mexican flavors. So, roll up your sleeves, and let’s get cooking!
1. Classic Guacamole

Classic Guacamole is a must-have at any Mexican fiesta. This creamy dip, made from fresh avocados, offers a delightful blend of lime juice, tomatoes, onions, and cilantro. It’s the perfect pairing for crispy tortilla chips, bringing a burst of flavor that everyone loves. Plus, it’s quick to make, so you can whip it up in no time!
If you’re ready to impress your guests, here’s how to make it:
Recipe Overview:
– Servings: 4
– Prep Time: 10 minutes
– Total Time: 10 minutes
– Calories: About 150 per serving
Ingredients:
– 2 ripe avocados
– 1 lime, juiced
– 1 small onion, finely chopped
– 2 medium tomatoes, diced
– A handful of cilantro, chopped
– Salt and pepper to taste
Instructions:
1. Slice the avocados in half, remove the pit, and scoop the flesh into a mixing bowl.
2. Use a fork to mash the avocados until they’re a bit chunky.
3. Mix in the lime juice, onion, tomatoes, cilantro, salt, and pepper.
4. Taste your guacamole and adjust the seasoning if needed.
5. Serve right away with your favorite tortilla chips!
Want to spice things up? Add a diced jalapeño for a zesty kick. To keep your guacamole fresh, press plastic wrap directly onto its surface before storing. This helps prevent browning.
Nutrition Information:
– Total Fat: 10g
– Saturated Fat: 1.5g
– Carbohydrates: 9g
– Fiber: 7g
– Protein: 2g
Here are some common questions about guacamole:
Can I make guacamole ahead of time? It’s best fresh, but if you must, store it properly to keep that vibrant green color!
What if I don’t like cilantro? No worries! Chopped parsley works just as well.
With this simple recipe, you’ll serve up a dish that’s not just delicious but also brings everyone together. Enjoy your fiesta!
Classic Guacamole
Editor’s Choice

WHYSKO Meal Prep Stainless Steel Mixing Bowl (5-Piece Set) Home, Refrige…

Amazon Grocery, Restaurant Style Tortilla Chips, 20 Oz (Previously Amazo…
2. Spicy Salsa Fresca

Get ready to spice up your next gathering with a bowl of Spicy Salsa Fresca. This fresh salsa is a vibrant mix of ripe tomatoes, zesty onions, and a kick of jalapeño. It’s not just a dip; it’s a burst of flavor that brightens any appetizer table. With its colorful ingredients, it’s as much a feast for the eyes as it is for the taste buds. Imagine scooping up this zesty salsa with crispy tortilla chips—pure bliss!
Making this salsa is a breeze and takes only 15 minutes. It’s perfect for parties or a casual snack at home. Plus, you can adjust the heat to fit your taste. If you want a milder version, use fewer jalapeños. For an extra twist, consider roasting your tomatoes for a smoky flavor. Let’s get into the recipe so you can whip this up in no time!
Recipe Overview:
– Servings: 6
– Prep Time: 15 minutes
– Total Time: 15 minutes
– Calories: About 50 per serving
Ingredients:
– 4 ripe tomatoes, diced
– 1 small onion, finely chopped
– 1 jalapeño, seeded and minced
– A handful of cilantro, chopped
– Juice of 1 lime
– Salt to taste
Instructions:
1. In a mixing bowl, combine the diced tomatoes, onion, jalapeño, cilantro, and lime juice.
2. Stir everything together until well mixed. Add salt to your liking.
3. Let the salsa sit for about 10 minutes. This allows the flavors to blend beautifully.
4. Serve with tortilla chips or as a topping on tacos for an extra punch!
You might wonder if you can use canned tomatoes instead. Fresh is always best, but in a pinch, canned will work. Store any leftovers in the fridge for 3-5 days in an airtight container. This salsa not only brings life to your dishes but also makes every meal feel special. Enjoy the freshness!
Tips:
– Use fresh ingredients for the best flavor.
– Choose ripe tomatoes for sweetness and juiciness.
– Pick a mild or hot jalapeño based on your heat preference.
– Add diced avocado for creaminess and extra flavor.
Spicy Salsa Fresca
Editor’s Choice
![Bamboo Cutting Boards for Kitchen [Set of 3] Wood Cutting Board for Chop...](https://m.media-amazon.com/images/I/81gLwPfpWbL._AC_UL320_.jpg "29 Easy Mexican Appetizer Recipes for Your Next Party 7")
Bamboo Cutting Boards for Kitchen [Set of 3] Wood Cutting Board for Chop…

Astercook Knife Set, 13 Pieces Kitchen Knives Set with Healthy Anti-Rust…

Umite Chef Mixing Bowls with Airtight Lids Set, 8PCS Stainless Steel Kha…
3. Queso Fundido

Queso Fundido is a must-have for any Mexican feast. Picture this: gooey, melted cheese mingling with spicy chorizo, all served hot and fresh with warm tortillas for dipping. This dish is pure comfort food that will leave your guests craving more!
Getting started is easy. Gather your ingredients and let’s create this cheesy masterpiece. Here’s what you’ll need:
Ingredients:
– 2 cups shredded cheese (Oaxaca or Chihuahua works great)
– 1 cup cooked chorizo
– 1 jalapeño, diced
– Fresh cilantro for garnish
– Warm tortillas for serving
Instructions:
1. Preheat your oven to 350°F (175°C).
2. In a cast-iron skillet, cook the chorizo over medium heat until it’s nicely browned.
3. In a bowl, combine the shredded cheese and diced jalapeño.
4. Layer the cheese mix over the chorizo in the skillet.
5. Bake for 10-15 minutes until the cheese is bubbly and golden.
6. Garnish with fresh cilantro and serve immediately with warm tortillas.
Want to elevate your Queso Fundido? Add roasted peppers for a smoky flavor! Just keep an eye on your cheese while it bakes so it doesn’t burn.
Nutrition Information:
– Total Fat: 23g
– Sodium: 500mg
– Carbohydrates: 5g
– Protein: 15g
Frequently Asked Questions:
– Can I make it vegetarian? Absolutely! Just skip the chorizo and toss in some sautéed veggies instead.
– What cheese works best? Mixing different cheeses will give you a richer taste, so don’t hesitate to experiment!
With Queso Fundido on the menu, you’re sure to impress your guests at your next party. Enjoy every cheesy bite!
Queso Fundido
Editor’s Choice

Lodge 12 Inch Cast Iron Skillet with Red Silicone Hot Handle Holder – Pr…


Nordic Ware Microwave Tortilla and Pancake Warmer, 10-Inch Holder – Fits…
4. Mini Tacos

Mini tacos are a crowd-pleaser, perfect for your next gathering. These tiny treats pack all the flavor of traditional tacos into a fun, bite-sized version. The best part? You can customize them to suit everyone’s tastes. Guests will love building their own mini tacos with their favorite toppings!
Here’s what you’ll need for this easy recipe:
Recipe Overview:
– Servings: 8
– Prep Time: 20 minutes
– Cook Time: 10 minutes
– Total Time: 30 minutes
– Calories: Approximately 200 per serving
Ingredients:
– 1 lb ground beef or turkey
– 1 packet taco seasoning
– 16 mini tortillas
– Shredded lettuce
– Diced tomatoes
– Shredded cheese
– Sour cream for serving
Instructions:
1. In a skillet, cook the ground meat over medium heat until it’s browned.
2. Stir in the taco seasoning and add water as directed on the packet. Let it simmer until thickened.
3. Warm the mini tortillas in another skillet until they are soft.
4. Now, it’s time to assemble! Place the cooked meat on each tortilla and top with lettuce, tomatoes, and cheese.
5. Serve with a generous dollop of sour cream on the side.
Want to make it healthier? Try using grilled chicken or black beans instead of beef. You can also set up a taco bar where everyone can create their own masterpiece. This way, your guests can mix and match ingredients, making it an interactive experience!
Nutrition Information:
– Total Fat: 12g
– Sodium: 350mg
– Carbohydrates: 12g
– Protein: 15g
Frequently Asked Questions:
– Can I make them ahead of time? Yes! Prepare the meat and toppings in advance, then assemble just before serving.
– What sides go well with mini tacos? Chips and salsa or a fresh salad are great choices.
These mini tacos are not just a dish; they’re a fun way to get everyone involved in the meal. Enjoy the flavors and the smiles they bring!
Mini Tacos
Editor’s Choice

Taco Holders 4 Packs – Stainless Steel Taco Stand Rack Tray Style, Oven …

5. Stuffed Jalapeños

Looking for a crowd-pleasing appetizer that packs a punch? Stuffed jalapeños are the perfect solution! These spicy delights combine the creamy richness of cheese with just the right amount of heat, making them irresistible. Imagine serving these golden, bubbling treats at your next gathering, impressing everyone with your culinary skills.
Here’s how to make them:
Recipe Overview:
– Servings: 6
– Prep Time: 15 minutes
– Cook Time: 20 minutes
– Total Time: 35 minutes
– Calories: About 250 per serving
Ingredients:
– 12 jalapeños, halved and seeded
– 8 oz cream cheese, softened
– 1 cup shredded cheddar cheese
– 1/2 cup cooked bacon, crumbled
– 1 tsp garlic powder
– Salt and pepper to taste
Instructions:
1. Preheat your oven to 375°F (190°C).
2. In a mixing bowl, combine the cream cheese, cheddar cheese, crumbled bacon, garlic powder, salt, and pepper. Stir until well blended.
3. Carefully stuff each jalapeño half with the cheese mixture.
4. Arrange the stuffed jalapeños on a baking sheet and bake for 20 minutes, or until they are golden and bubbly.
5. Let them cool slightly before serving.
Want to customize your stuffed jalapeños? Here are some tips:
Mix different cheeses for added flavor. You could try a combination of pepper jack for heat and mozzarella for creaminess.
Choose milder peppers if you want less heat. Bell peppers or Anaheim peppers work well for a gentler bite.
FAQs:
– Can I use other peppers? Absolutely! Feel free to experiment with any mild pepper varieties.
– What dips pair well? Serve these with ranch or blue cheese dressing for extra flavor.
Enjoy these stuffed jalapeños at your next party and watch how quickly they disappear!
Stuffed Jalapeños
Editor’s Choice

Amazon Basics Silicone Rectangular Baking Mat, Non-Stick Reusable Oven B…
6. Mexican Street Corn (Elote)

Mexican Street Corn, or Elote, is a crowd-pleaser that adds a burst of flavor to any gathering. This grilled corn-on-the-cob dish is generously coated with creamy toppings, making it a delightful appetizer. The combination of smoky, spicy, and tangy flavors will have your guests coming back for more!
Imagine biting into sweet, charred corn, topped with a rich spread of mayonnaise and zesty lime juice. The sprinkling of crumbled cotija cheese adds a salty kick, while the chili powder gives it a little heat. This dish is not just delicious; it’s colorful and fun, making it a perfect addition to your appetizer table.
Ready to make this tasty treat? Here’s how you can whip up your own Mexican Street Corn in no time!
Recipe Overview:
– Servings: 4
– Prep Time: 10 minutes
– Cook Time: 20 minutes
– Total Time: 30 minutes
– Calories: About 200 per serving
Ingredients:
– 4 ears of corn, husked
– 1/2 cup mayonnaise
– 1/2 cup crumbled cotija cheese
– 1 tsp chili powder
– Juice of 1 lime
– Fresh cilantro for garnish
Instructions:
1. Preheat your grill to medium heat.
2. Grill the corn, turning occasionally, for about 10-15 minutes or until the corn is nicely charred.
3. In a bowl, combine mayonnaise, lime juice, chili powder, and half of the cotija cheese.
4. Brush this creamy mixture over the hot corn.
5. Sprinkle the remaining cotija cheese and fresh cilantro on top.
6. Serve your Elote warm and enjoy!
Want to spice things up? Just add more chili powder or use your favorite hot sauce. If you’re serving a big crowd, consider cutting grilled corn off the cob for easy sharing!
Frequently Asked Questions:
– Can I make it in the oven? Yes! You can broil the corn if you don’t have a grill.
– What can I substitute for cotija cheese? Feta cheese works great as a substitute.
Now you have a simple yet delicious recipe that will impress your guests. Enjoy the delightful flavors of Mexican Street Corn at your next party!
Did you know that a single cob of Elote can shine with just 4 toppings and still stay under 250 calories? This easy mexican food recipes appetizers prove that quick, crowd-pleasing bites exist in simple, flavorful ways—perfect for busy hosts.
Mexican Street Corn (Elote)
Editor’s Choice


El Mexicano El Mexicano, Cotija Cheese, 10 Ounce, 12 OZ

McCormick Culinary Dark Chili Powder, 20 oz – One 20 Ounce Container or …
7. Chorizo and Cheese Nachos

Step up your party game with delicious Chorizo and Cheese Nachos! These nachos are a crowd-pleaser, combining crunchy tortilla chips with spicy chorizo and gooey melted cheese. Each bite bursts with flavor and texture, making them the perfect snack for any gathering. Your guests will love digging into this tasty treat, and you’ll love how simple they are to make!
Here’s how to whip up this easy dish:
Recipe Overview:
– Servings: 6
– Prep Time: 10 minutes
– Cook Time: 15 minutes
– Total Time: 25 minutes
– Calories: About 350 per serving
Ingredients:
– 1 bag tortilla chips
– 1 cup cooked chorizo
– 2 cups shredded cheese (cheddar or Monterey Jack work well)
– Jalapeños for topping
– Sour cream and salsa for serving
Instructions:
1. Preheat your oven to 350°F (175°C).
2. Spread the tortilla chips evenly across a large baking sheet.
3. Sprinkle the cooked chorizo and cheese generously over the chips.
4. Bake for 10-15 minutes until the cheese melts and bubbles.
5. Top with jalapeños and serve hot with sour cream and salsa on the side.
Tips for the Best Nachos:
– Mix cheeses for a richer flavor profile.
– Customize with toppings like olives, guacamole, or diced tomatoes.
– Layer ingredients for evenly melted cheese throughout.
– Make ahead by prepping the nachos and baking them just before serving.
These nachos are not just a dish; they bring joy and excitement to your table. Perfect for game day, movie night, or any occasion, they’ll keep everyone coming back for more. Enjoy the compliments as your guests savor these delightful bites!
Chorizo and Cheese Nachos
Editor’s Choice
Lodge 12 Inch Cast Iron Skillet with Red Silicone Hot Handle Holder – Pr…

54oz Clear Plastic Serving Bowls (4 Pack) Large Disposable Candy Dishes,…

Urbanstrive Cheese Grater With Container Box Grater Stainless Steel Grat…
8. Avocado and Black Bean Tostadas

Craving a delicious appetizer that’s easy to make and sure to impress? Look no further than these vibrant avocado and black bean tostadas! They’re not only vegetarian but also packed with flavor and texture. The crunch of the tostada shell pairs perfectly with the creamy avocado and hearty black beans, making each bite a delightful experience. Plus, their colorful presentation adds a festive touch to your appetizer table!
Recipe Overview:
– Servings: 4
– Prep Time: 15 minutes
– Cook Time: 10 minutes
– Total Time: 25 minutes
– Calories: About 200 per serving
Ingredients:
– 8 tostada shells
– 1 can black beans, rinsed and drained
– 2 ripe avocados, mashed
– 1 lime, juiced
– Diced tomatoes and onions for topping
– Fresh cilantro for garnish
Instructions:
1. Preheat your oven. Bake the tostada shells until they are crispy, about 10 minutes.
2. In a mixing bowl, mash the avocados. Stir in lime juice, salt, and pepper until well blended.
3. Spread a layer of black beans on each tostada shell.
4. Top generously with the mashed avocado.
5. Finish with a sprinkle of diced tomatoes, onions, and fresh cilantro.
6. Serve right away for the best crunch!
Want to kick up the flavor? Try adding a sprinkle of taco seasoning to the black beans. And for a zesty twist, serve with a side of your favorite salsa.
Nutrition Information:
– Total Fat: 14g
– Sodium: 300mg
– Carbohydrates: 22g
– Protein: 8g
Frequently Asked Questions:
– Can I use store-bought tostadas? Absolutely! They work perfectly for this recipe.
– How can I make them spicier? Just add sliced jalapeños on top for an extra kick!
These tostadas are not just a treat for your taste buds but also a feast for the eyes. They’re perfect for parties, game days, or a fun family snack. Enjoy diving into this fresh and healthy appetizer!
Avocado and Black Bean Tostadas
Editor’s Choice

Ortega Homestyle Tostada Shells, 8 Count (Pack of 1)


Cholula Salsa Variety Pack (Original, Smoky Chipotle, and Salsa Verde), …
9. Corn and Zucchini Fritters

Imagine biting into a warm, crispy fritter that’s bursting with flavor! These corn and zucchini fritters are not just tasty—they’re also a healthy choice for your next gathering. With a golden crust and a soft, savory center, they’re bound to impress your guests. Plus, they’re simple to whip up, making them a go-to appetizer that everyone will love.
Recipe Overview:
– Servings: 4
– Prep Time: 15 minutes
– Cook Time: 15 minutes
– Total Time: 30 minutes
– Calories: Approximately 180 per serving
Ingredients:
– 1 cup corn kernels
– 1 cup grated zucchini
– 1/2 cup all-purpose flour
– 1 egg
– 1 teaspoon chili powder
– Salt and pepper to taste
– Olive oil for frying
Instructions:
1. In a large bowl, mix together the corn, zucchini, flour, egg, chili powder, salt, and pepper until well combined.
2. Heat about 1/4 inch of olive oil in a skillet over medium heat.
3. Using a spoon, drop small amounts of the mixture into the hot oil, flattening each spoonful slightly to form fritters.
4. Cook them for about 3-4 minutes on each side, or until they turn golden brown.
5. Once cooked, transfer them to paper towels to drain excess oil. Serve warm for the best flavor!
For an extra kick, add diced bell peppers to the mix, or serve with a cool yogurt dip that complements the fritters perfectly.
Nutrition Information (per serving):
– Total Fat: 7g
– Sodium: 150mg
– Carbohydrates: 22g
– Protein: 5g
Frequently Asked Questions:
– Can I bake these fritters instead? Yes, you can bake them at 375°F (190°C) until they are golden brown for a lighter option.
– How long do leftovers last? You can keep them in the fridge for 2-3 days. Just reheat before serving!
These fritters are not only delicious but also versatile. They’re a fantastic way to use fresh vegetables, making your appetizer table both colorful and appealing. Enjoy your cooking adventure!
Corn and Zucchini Fritters
Editor’s Choice

CAROTE Nonstick Frying Pan Skillet,Non Stick Granite Fry Pan Egg Pan Ome…
Umite Chef Mixing Bowls with Airtight Lids Set, 8PCS Stainless Steel Kha…
10. Cucumber and Mango Salsa

Cucumber and mango salsa is a game-changer for your party snacks. This vibrant dip combines the juicy sweetness of ripe mango with the crisp freshness of cucumber. Each bite bursts with flavor, making it a perfect companion for tortilla chips or a zesty topping for tacos. Your guests will love this light and refreshing alternative to traditional salsas!
Let’s get into the details of making this delicious salsa. It’s quick to prepare, taking only about 10 minutes. Plus, it’s low in calories, so you can enjoy it guilt-free. Here’s how to whip it up:
Recipe Overview:
– Servings: 4
– Prep Time: 10 minutes
– Total Time: 10 minutes
– Calories: About 70 per serving
Ingredients:
– 1 ripe mango, diced
– 1 cucumber, diced
– 1/2 red onion, finely chopped
– Juice of 1 lime
– Salt and pepper to taste
Instructions:
1. In a medium bowl, combine the diced mango, cucumber, and red onion.
2. Squeeze the lime juice over the mixture and sprinkle with salt and pepper.
3. Gently toss everything together until well mixed.
4. Let it rest for about 5 minutes. This allows the flavors to blend beautifully before serving.
Want a little heat? Add diced jalapeños to spice things up! This salsa also pairs wonderfully with grilled fish, enhancing the dish with a tropical twist.
Nutrition Information:
– Total Fat: 0g
– Sodium: 10mg
– Carbohydrates: 16g
– Protein: 1g
Frequently Asked Questions:
– How long does it last? It’s best enjoyed fresh but can be stored in the fridge for 1-2 days.
– What can I serve it with? This salsa is fantastic with tortilla chips, tacos, or as a topping for grilled meats.
Now you’re ready to serve up this delightful cucumber and mango salsa at your next gathering. Enjoy the compliments!
Cucumber and Mango Salsa
Editor’s Choice

Mercer Culinary M22608 Millennia Black Handle, 8-Inch, Chef’s Knife
Umite Chef Mixing Bowls with Airtight Lids Set, 8PCS Stainless Steel Kha…
11. Pesto Quesadillas

Get ready to impress your guests with delicious pesto quesadillas! These cheesy treats pack a flavorful punch that both kids and adults will love. The combination of gooey mozzarella and aromatic pesto creates a delightful twist on the classic quesadilla. Perfect for parties, game days, or any gathering, they’re quick to make and sure to be a hit!
Here’s how to whip them up:
Recipe Overview:
– Servings: 6
– Prep Time: 10 minutes
– Cook Time: 10 minutes
– Total Time: 20 minutes
– Calories: About 250 per serving
Ingredients:
– 6 flour tortillas
– 1 cup shredded mozzarella cheese
– 1/2 cup pesto (store-bought or homemade)
– Olive oil for grilling
Instructions:
1. Spread a generous layer of pesto on one side of each tortilla.
2. Sprinkle shredded mozzarella over half of the tortilla for that cheesy goodness.
3. Fold the tortilla in half and press it down gently to keep everything inside.
4. In a skillet, heat a splash of olive oil over medium heat.
5. Cook each quesadilla for about 3-4 minutes on each side until they turn golden and the cheese melts beautifully.
6. Slice them into wedges, serve warm, and watch them disappear!
Want to add even more flavor? Toss in some sliced tomatoes or fresh spinach for added nutrition. These quesadillas taste amazing when dipped in marinara sauce, making them a unique appetizer option!
Nutrition Information:
– Total Fat: 14g
– Sodium: 350mg
– Carbohydrates: 25g
– Protein: 7g
Frequently Asked Questions:
– Can I make them ahead of time? Yes! You can assemble the quesadillas and grill them just before serving for the best taste.
– What else can I use? Feel free to experiment with different cheeses or sauces to create your own flavor combinations!
Pesto quesadillas are not only easy to make, but they also bring a gourmet touch to your table. Enjoy the deliciousness at your next party!
Pesto Quesadillas
Editor’s Choice

SENSARTE Nonstick Frying Pan Skillet, Swiss Granite Coating Omelette Pan…


365 by Whole Foods Market Shredded Mexican Blend, 8 OZ
12. Sweet Potato Taquitos

Sweet potato taquitos are the perfect blend of sweet and savory. These crispy delights are not just tasty; they also offer a nutritious twist on traditional taquitos. Imagine biting into a warm tortilla filled with creamy sweet potato, seasoned just right. You’ll find they make a fantastic appetizer for any gathering, and they’re super easy to prepare!
Ready to make them? Here’s what you’ll need:
Ingredients:
– 2 medium sweet potatoes, cooked and mashed
– 1 tsp cumin
– 1 tsp chili powder
– 8 corn tortillas
– Olive oil for frying
Instructions:
1. Start by mixing the mashed sweet potatoes with cumin and chili powder in a bowl. This blend gives your filling a delicious kick!
2. Warm the corn tortillas slightly on a skillet. This helps them become flexible for rolling.
3. Spoon some of the sweet potato mixture onto each tortilla and roll them tightly to keep the filling inside.
4. Heat olive oil in a skillet over medium heat. Fry the taquitos until they are golden brown and crispy, about 3-4 minutes per side.
5. Drain on paper towels to get rid of excess oil. Serve with your favorite salsa for dipping!
Want a healthier option? You can bake these taquitos instead! Just place them on a baking sheet and cook at 400°F (200°C) for about 25 minutes, flipping halfway through.
For a fresh touch, add toppings like diced avocado or chopped cilantro before serving.
Nutrition Information (per serving):
– Total Fat: 10g
– Sodium: 150mg
– Carbohydrates: 30g
– Protein: 3g
Frequently Asked Questions:
– Can I use regular potatoes? Yes, white or yellow potatoes work too!
– What dipping sauces pair well? Try creamy guacamole or tangy sour cream for a tasty match!
These sweet potato taquitos are sure to impress your guests. Enjoy them at your next party or as a fun snack any day of the week!
Sweet Potato Taquitos
Editor’s Choice
Lodge 12 Inch Cast Iron Skillet with Red Silicone Hot Handle Holder – Pr…

GoodCook Everyday Nonstick Carbon Steel Baking Sheet Set, 3 Pack – Small…
13. Black Bean Hummus

Are you ready to spice up your next gathering? Black bean hummus is a fun twist on the traditional chickpea dip. This creamy, flavorful dip is not only delicious but also healthy! It’s perfect for dipping fresh veggies or crunchy chips, making it a crowd-pleaser for any party.
Imagine the taste of rich black beans blended with zesty lime and a hint of garlic. It’s a taste sensation that will keep your guests coming back for more. Plus, it takes just 10 minutes to whip up! You can even customize it with spicy jalapeños if you want to kick things up a notch.
Here’s how to make this delightful dip:
Recipe Overview:
– Servings: 8
– Prep Time: 10 minutes
– Total Time: 10 minutes
– Calories: About 100 per serving
Ingredients:
– 1 can black beans, rinsed and drained
– 2 tbsp tahini
– 2 tbsp lime juice
– 1 clove garlic
– 1 tsp cumin
– Salt to taste
Instructions:
1. In a food processor, add black beans, tahini, lime juice, garlic, cumin, and salt.
2. Blend until smooth. If the mixture is too thick, add a little water to reach your desired consistency.
3. Serve with fresh veggie sticks or your favorite chips!
For a beautiful presentation, drizzle olive oil on top and sprinkle with paprika. It adds a pop of color that looks great on any table.
Quick Tips:
– Add jalapeños for extra heat!
– Drizzle olive oil for richness.
– Store leftovers in an airtight container for up to a week.
– Experiment with spices like smoked paprika for a different flavor twist.
This black bean hummus is not just tasty; it’s also packed with protein and fiber. It’s a smart choice for your health, and your friends will love it!
Got questions? Feel free to ask! It’s time to impress your guests with this easy and delicious dip.
Black Bean Hummus
Editor’s Choice

Hamilton Beach Electric Vegetable Chopper & Mini Food Processor, 3-Cup, …

Measuring Spoons, Premium Heavy Duty 18/8 Stainless Steel Measuring Spoo…

4-Pack Plastic 16″ x 11″ Large White Serving Trays Set – Reusable Servin…
14. Cheese-Stuffed Poblano Peppers

Imagine hosting a party where the guests rave about your appetizers. Cheese-stuffed poblano peppers can be that star dish! Their mild heat pairs perfectly with a creamy cheese filling, creating mouthwatering bites that burst with flavor. These peppers are not only delicious, but they also add a colorful touch to your table, making them a hit at any gathering.
Ready to make some? Here’s a simple recipe for you to follow. It’s quick, easy, and packed with cheesy goodness. Plus, you can customize it to match your taste preferences or experiment with different cheeses. Let’s get cooking!
Recipe Overview:
– Servings: 4
– Prep Time: 15 minutes
– Cook Time: 25 minutes
– Total Time: 40 minutes
– Calories: Approximately 200 per serving
Ingredients:
– 4 poblano peppers
– 1 cup cream cheese
– 1 cup shredded cheese (like Monterey Jack)
– 1 tsp garlic powder
– Olive oil for drizzling
Instructions:
1. Preheat your oven to 400°F (200°C).
2. Slice the poblano peppers in half lengthwise and remove the seeds.
3. In a bowl, mix together the cream cheese, shredded cheese, and garlic powder until smooth.
4. Stuff each half of the pepper with the cheese mixture, packing it in well.
5. Place the stuffed peppers on a baking sheet, drizzle with olive oil, and bake for about 25 minutes until they turn golden and bubbly.
Feel free to experiment with different cheese blends for a unique twist. Try adding a sprinkle of spices or herbs for extra flavor. Serve these tasty peppers with a side of salsa for dipping, and watch your guests come back for seconds!
Nutrition Information:
– Total Fat: 15g
– Sodium: 300mg
– Carbohydrates: 8g
– Protein: 10g
Frequently Asked Questions:
– Can I use other peppers? Yes! Any mild pepper works well.
– How spicy are poblano peppers? They are usually mild, but some may have a bit more kick.
With this simple recipe, your next gathering will be a hit. Enjoy the delicious flavors and the compliments from your guests!
Cheese-Stuffed Poblano Peppers
Editor’s Choice

Sow Right Seeds – Poblano Pepper Seeds for Planting – Non-GMO Heirloom P…

Kraft Philadelphia Original Cream Cheese Pouches (50 Pack)
GoodCook Everyday Nonstick Carbon Steel Baking Sheet Set, 3 Pack – Small…
15. Cilantro Lime Rice

Cilantro lime rice is a delightful addition to any gathering. This dish bursts with fresh flavors, thanks to the zesty lime and aromatic cilantro. It’s not just a side; it’s a versatile appetizer that pairs wonderfully with your favorite dips or can even stand alone as a light snack. Imagine serving this fragrant rice at your next party, where every bite brings a refreshing twist to your meal!
Making cilantro lime rice is quick and easy. In just 25 minutes, you can whip up this tasty dish, making it perfect for busy hosts. Plus, it’s budget-friendly! You can even prepare it the day before to let the flavors meld together. Serve it alongside grilled meats, or use it as a base for burritos and tacos. Your guests will love the bright, tangy taste.
Here’s how to make it:
Ingredients:
– 2 cups cooked rice
– Juice of 1 lime
– A handful of fresh cilantro, chopped
– Salt to taste
Instructions:
1. In a large bowl, mix together cooked rice, lime juice, chopped cilantro, and salt.
2. Stir until everything is well combined.
3. Serve it warm as a side, or use it as a tasty base for tacos or burritos!
You can customize this dish by adding black beans or corn for a heartier option. It stays fresh in the fridge for about 3-4 days, making it a great meal prep item.
Here are some tips to get the most out of your cilantro lime rice:
– Add spices like cumin for extra flavor.
– Use brown rice for added nutrients.
– Garnish with lime wedges for a pop of color.
– Pair it with grilled chicken or fish for a complete meal.
With this cilantro lime rice, you’ll be ready to impress your guests at your next party. Enjoy the vibrant flavors and the smiles on their faces!
Cilantro Lime Rice
Editor’s Choice

Aroma Housewares Aroma 6-cup (cooked) 1.5 Qt. One Touch Rice Cooker, Whi…

Herb Scissors Set – Updated 2025 Cool Kitchen Gadgets for Cutting Fresh …

Zulay Kitchen Metal 2-in-1 Lemon Squeezer – Sturdy Max Extraction Hand J…
16. Chilled Avocado Soup

Chilled avocado soup is your go-to appetizer for warm days. This bright and creamy dish not only delights the senses but also provides a refreshing taste that’ll impress your guests. The smooth texture and savory flavor make it a must-have at any gathering!
To make this delicious soup, you only need a few ingredients. Let’s jump into the recipe.
Recipe Overview:
– Servings: 4
– Prep Time: 10 minutes
– Total Time: 10 minutes
– Calories: About 120 per serving
Ingredients:
– 2 ripe avocados
– 2 cups vegetable broth
– 1/2 cup yogurt (Greek yogurt works great for extra creaminess!)
– Juice of 1 lime
– Salt and pepper to taste
Instructions:
1. Cut the avocados in half, remove the pit, and scoop the flesh into a blender.
2. Add the vegetable broth, yogurt, lime juice, salt, and pepper.
3. Blend everything until it’s smooth and creamy.
4. Chill the soup in the refrigerator for at least one hour before serving.
5. When ready to serve, garnish with fresh herbs like cilantro or diced vegetables for a pop of color.
Want to add a twist? Top it with diced cucumber for a refreshing crunch or a drizzle of olive oil for richness!
Nutrition Facts:
– Total Fat: 9g
– Sodium: 300mg
– Carbohydrates: 15g
– Protein: 3g
Common Questions:
– How long does chilled avocado soup last? It’s best enjoyed fresh, but you can keep leftovers in the fridge for a day or two.
– Can I freeze it? Freezing is not recommended, as it can change the soup’s creamy texture.
This chilled avocado soup is perfect for summer parties, picnics, or whenever you crave something light and zesty. Enjoy the fresh flavors and impress your friends with this easy, healthy appetizer!
Chilled Avocado Soup
Editor’s Choice

Ninja BL660 Professional Compact Smoothie & Food Processing Blender, 110…

Mfacoy 2 Pack Salad Bowl, 8 inch 60 oz Large Serving Bowl Set, Deep Bowl…
17. Roasted Corn and Pepper Salad

Brighten up your next gathering with a Roasted Corn and Pepper Salad. This dish isn’t just a feast for the eyes; it’s packed with flavor and texture. Imagine sweet, juicy corn mixed with smoky, roasted peppers. Together, they create a vibrant appetizer that will impress your guests and keep them coming back for more. Whether you serve it as a side or a stand-alone snack, this salad is bound to be a hit!
Let’s make this delicious salad! Start with fresh ingredients for the best taste. You’ll need some simple items that won’t break the bank. This salad is not only easy to prepare but also versatile. You can enjoy it warm or let it cool to room temperature. It’s perfect for summer barbecues, potlucks, or even taco night.
Here’s how to whip up this delightful dish:
Ingredients:
– 2 cups corn kernels (fresh or frozen)
– 1 red bell pepper, diced
– 1 green bell pepper, diced
– 1/4 cup red onion, chopped
– Juice of 1 lime
– Olive oil, salt, and pepper to taste
Instructions:
1. Preheat your oven to 400°F (200°C).
2. Spread the corn and diced peppers on a baking sheet.
3. Drizzle with olive oil and sprinkle with salt and pepper. Toss to coat.
4. Roast for about 15 minutes, or until the veggies are lightly charred.
5. Once done, let it cool for a few minutes. Then add lime juice and toss everything together.
6. Serve it warm or at room temperature, and enjoy!
Want to make it extra special? Add creamy avocado or crumbled feta cheese for a delicious twist. This salad also makes a fantastic topping for tacos or a refreshing side dish for grilled meats.
Nutrition Info:
– Total Fat: 7g
– Sodium: 5mg
– Carbohydrates: 25g
– Protein: 5g
Frequently Asked Questions:
– Can I use frozen corn? Yes, frozen corn works just fine for this recipe!
– How long does it last? Store it in an airtight container in the fridge for up to 3 days.
Now you’re ready to impress your friends and family with this simple, colorful salad that’s perfect for any occasion!
Roasted Corn and Pepper Salad
Editor’s Choice

Organic Extra Virgin Olive Oil – Premium Single-Source Greek EVOO with C…
Umite Chef Mixing Bowls with Airtight Lids Set, 8PCS Stainless Steel Kha…
GoodCook Everyday Nonstick Carbon Steel Baking Sheet Set, 3 Pack – Small…
18. Savory Sweet Potato Hush Puppies

Sweet potato hush puppies bring a fun twist to your appetizer spread. These golden, crispy bites have a fluffy center that will delight your taste buds. Whether you’re hosting a party or enjoying a cozy night in, they’re perfect for dipping into your favorite spicy sauce. And let’s be honest—who can resist a delicious snack that’s both comforting and satisfying?
To make these hush puppies, you’ll need just a few simple ingredients. They’re quick to prepare, taking only about 15 minutes to whip up and another 15 to cook. Plus, each serving is around 180 calories, making them a tasty, guilt-free option for your guests.
Recipe Overview:
– Servings: 4
– Prep Time: 15 minutes
– Cook Time: 15 minutes
– Total Time: 30 minutes
– Calories: About 180 per serving
Ingredients:
– 1 cup mashed sweet potatoes
– 1/2 cup cornmeal
– 1/2 cup all-purpose flour
– 1 egg
– 1 tsp baking powder
– Salt and pepper to taste
– Oil for frying
Instructions:
1. In a mixing bowl, combine the mashed sweet potatoes, cornmeal, flour, egg, baking powder, salt, and pepper. Mix until smooth.
2. Heat oil in a deep saucepan over medium heat.
3. Carefully drop spoonfuls of the batter into the hot oil. Fry until they turn a lovely golden brown, around 3-4 minutes each side.
4. Remove the hush puppies and let them drain on paper towels.
5. Serve warm, ideally with a spicy dipping sauce for an extra kick!
Want to spice things up? Add chopped jalapeños to the batter for some heat. Or, experiment with your favorite herbs and spices to create a unique flavor that suits your taste.
Nutrition Information:
– Total Fat: 8g
– Sodium: 150mg
– Carbohydrates: 25g
– Protein: 3g
Frequently Asked Questions:
– Can I bake them instead? Yes! Bake at 375°F (190°C) until golden brown.
– What other flavors can I add? Try mixing in your favorite herbs, cheese, or spices for a twist!
These hush puppies bring a delightful punch of flavor to any gathering. Their crispy texture and sweet potato goodness will have everyone coming back for more. Enjoy your cooking adventure!
Savory Sweet Potato Hush Puppies
Editor’s Choice

T-fal 3.5L Stainless Steel Deep Fryer with Basket for Home Use, 1700W, D…

19. Cabbage and Avocado Slaw

Looking for a fresh and crunchy side that will brighten up your appetizer spread? Look no further than this delightful cabbage and avocado slaw! This vibrant dish pairs perfectly with rich, hearty entrees and adds a pop of color to your table. With its creamy avocado and crisp cabbage, it’s a combination that everyone will love.
Making this slaw is as easy as pie! In just about 10 minutes, you can whip up a batch that serves six. It’s not only quick but also low in calories, at around 80 per serving. Plus, you can customize it to your taste!
Here’s how to create this refreshing slaw:
Ingredients:
– 2 cups shredded cabbage
– 1 ripe avocado, diced
– Juice of 1 lime
– Salt and pepper to taste
Instructions:
1. In a large bowl, start by combining the shredded cabbage and diced avocado.
2. Squeeze the lime juice over the mixture, then add salt and pepper to taste.
3. Toss everything gently until well mixed.
4. Serve immediately for a crunchy bite, or chill it in the fridge for 30 minutes for a cooler treat.
Feel free to add some sliced radishes for an extra crunch, or use this slaw as a topping for tacos or a side for nachos. It’s versatile and delicious!
Nutrition Information:
– Total Fat: 5g
– Sodium: 20mg
– Carbohydrates: 10g
– Protein: 2g
Frequently Asked Questions:
– Can I use different types of cabbage? Yes! Any variety will work well.
– How long does it last? For the best flavor, enjoy it fresh, but it can last a day in the fridge.
With this simple and tasty cabbage and avocado slaw, you’ll impress your guests while keeping it healthy. Enjoy the crunch and freshness at your next gathering!
Fun fact: this cabbage and avocado slaw packs flavor in just 10 minutes for six servings—about 80 calories per serving. It proves you can wow guests with easy mexican food recipes appetizers without spending hours in the kitchen.
Cabbage and Avocado Slaw
Editor’s Choice

Cabbage Slicer Smart Ultra-Thin Julienne – 0.04 inch Professional Thin S…
20. Shrimp Ceviche

Shrimp ceviche is a delightful, fresh appetizer that brings a burst of flavor to any gathering. This dish features shrimp marinated in zesty lime juice, making it light and refreshing. Imagine the tang of citrus paired with tender shrimp, crunchy veggies, and a hint of cilantro. It’s a perfect choice for impressing guests without spending hours in the kitchen.
To make this ceviche, you’ll need just a few simple ingredients. This recipe serves four and takes only 15 minutes of prep time, plus a little patience while the shrimp marinates. Here’s how to whip up this tasty treat:
Ingredients:
– 1 lb shrimp, peeled and deveined
– Juice of 4 limes
– 1/2 red onion, finely chopped
– 1 tomato, diced
– 1/2 cup fresh cilantro, chopped
– Salt and pepper to taste
Instructions:
1. Start by placing the shrimp in a bowl and pouring the lime juice over it. Let the shrimp soak for 30-60 minutes. The lime juice will ‘cook’ the shrimp.
2. Once the shrimp turn opaque, mix in the chopped onion, diced tomato, cilantro, salt, and pepper.
3. Stir everything together gently and serve chilled with crispy tortilla chips.
For the best flavor, always opt for fresh shrimp. You can also tweak the lime juice to suit your taste. If you love experimenting, consider adding scallops or white fish for an exciting twist.
Nutrition Information:
– Total Fat: 1g
– Sodium: 150mg
– Carbohydrates: 6g
– Protein: 30g
Frequently Asked Questions:
– Can I add other seafood? Yes, feel free to mix in scallops or your favorite fish!
– How long does it last? It’s best enjoyed fresh but can stay good in the fridge for up to 1-2 days.
This shrimp ceviche is not just a dish; it’s a celebration of flavors that will make your next party unforgettable. Enjoy every bite!
Shrimp Ceviche
Editor’s Choice

Amazon Grocery, Medium Raw Shrimp, 16 Oz (Previously Fresh Brand, Packag…

Elite Gourmet ETS740 BPA-Free Electric Citrus Juicer with 2 Cones, Compa…
Bamboo Cutting Boards for Kitchen [Set of 3] Wood Cutting Board for Chop…
21. Spiced Chickpea Tacos

Spiced chickpea tacos are a fantastic choice for anyone looking to impress guests with a flavorful, vegetarian appetizer. These tacos feature crispy roasted chickpeas wrapped in soft tortillas, making them both satisfying and health-conscious. Their vibrant flavors and textures will have everyone coming back for more!
Ready to whip up these tasty treats? Here’s a quick overview of what you’ll need and how to make them.
Recipe Overview:
– Servings: 4
– Prep Time: 10 minutes
– Cook Time: 15 minutes
– Total Time: 25 minutes
– Calories: About 220 per serving
Ingredients:
– 1 can chickpeas, rinsed and drained
– 1 tsp cumin
– 1 tsp paprika
– 1 tsp chili powder
– 8 small tortillas
– Diced avocado and chopped cilantro for topping
Instructions:
1. Preheat your oven to 400°F (200°C). In a mixing bowl, combine the chickpeas with cumin, paprika, and chili powder. Toss them well to coat.
2. Spread the chickpeas on a baking sheet and roast for 15 minutes, or until they turn crispy and golden.
3. Warm the tortillas in a pan or microwave. Then, fill each tortilla with the roasted chickpeas.
4. Top with diced avocado and chopped cilantro. Serve immediately for a delightful crunch!
Want to add a little extra flair? Consider these tips:
– Add some shredded cabbage for extra crunch and color.
– Serve with a tangy yogurt sauce for a creamy contrast.
Nutrition Information:
– Total Fat: 6g
– Sodium: 200mg
– Carbohydrates: 35g
– Protein: 10g
Frequently Asked Questions:
– Can I use canned or cooked chickpeas? Yes! Canned chickpeas save time and work perfectly.
– What spices can I add? Feel free to get creative! Add any spices you love for a personalized touch.
These spiced chickpea tacos are not just a healthy option; they bring vibrant flavors and are easy to make. Perfect for your next gathering, they’ll have your friends raving about your cooking skills! Enjoy the burst of flavors with every bite!
Spiced Chickpea Tacos
Editor’s Choice
GoodCook Everyday Nonstick Carbon Steel Baking Sheet Set, 3 Pack – Small…
Nordic Ware Microwave Tortilla and Pancake Warmer, 10-Inch Holder – Fits…

Amazon Basics Electric Coffee Grinder, Coffee Bean and Spice Grinder, Wi…
22. Garlic and Lime Grilled Shrimp

Garlic and lime grilled shrimp are the perfect solution for your next summer gathering. Imagine juicy shrimp bursting with zesty flavor, grilled to perfection. This dish not only impresses your guests but also takes just 25 minutes to prepare. You’ll love how simple it is to make and how quickly it disappears from the table!
Here’s what you need for this delicious appetizer:
Recipe Overview:
– Servings: 4
– Prep Time: 15 minutes
– Cook Time: 10 minutes
– Total Time: 25 minutes
– Calories: About 180 per serving
Ingredients:
– 1 lb shrimp, peeled and deveined
– 4 cloves garlic, minced
– Juice of 2 limes
– 2 tbsp olive oil
– Salt and pepper to taste
Instructions:
1. In a bowl, combine minced garlic, lime juice, olive oil, salt, and pepper.
2. Toss the shrimp in the marinade until they are well-coated. Let them marinate for at least 10 minutes.
3. Preheat your grill to medium-high heat.
4. Skewer the shrimp and grill them for 2-3 minutes on each side, until they turn opaque.
5. Serve hot, garnished with a sprinkle of fresh cilantro.
You can also enjoy these shrimp over rice or in tacos for a delightful meal.
Nutrition Information:
– Total Fat: 6g
– Sodium: 200mg
– Carbohydrates: 1g
– Protein: 22g
Have questions? Here are some quick answers:
– Can I use frozen shrimp? Absolutely! Just make sure they are fully thawed.
– What about dipping sauces? A garlic aioli or spicy mayo pairs wonderfully with grilled shrimp.
This recipe is not only delicious but also a hit at any gathering. Try it out, and watch your friends and family come back for more!
Garlic and Lime Grilled Shrimp
Editor’s Choice

Metal Skewer for Grilling,Kabob Skewer,Flat BBQ Barbecue Skewer,Grilling…
23. Grilled Vegetable Skewers

Grilled vegetable skewers are the perfect solution for a colorful, healthy appetizer that will wow your guests. These vibrant veggies, charred to perfection, not only look appetizing but also deliver a crunchy texture and a smoky flavor that everyone loves. Plus, they are incredibly easy to make! Pinterest is buzzing with ideas for these skewers, making them a trendy choice for your next get-together.
To whip up your own delicious skewers, gather your favorite vegetables. Think zucchini, bell peppers, and cherry tomatoes. You can even toss in some mushrooms or eggplant for extra variety. This dish is budget-friendly, as you can use whatever seasonal veggies are available. Grilled vegetable skewers are not just a tasty option; they also bring a fresh feel to your party spread. Serve them warm or at room temperature for the best experience.
Here’s how to make your grilled vegetable skewers:
Ingredients:
– 1 zucchini, sliced
– 1 bell pepper, chopped
– 1 red onion, cut into chunks
– 8 cherry tomatoes
– Olive oil, salt, and pepper to taste
Instructions:
1. Preheat your grill to medium heat.
2. In a bowl, mix the veggies with olive oil, salt, and pepper.
3. Thread the vegetables onto skewers.
4. Grill for about 10 minutes, turning occasionally until they are tender and slightly charred.
5. Serve them hot or at room temperature, and feel free to add a yogurt dip or chimichurri sauce for extra flavor!
Quick Tips:
– Use fresh herbs to enhance the flavor.
– Choose seasonal vegetables for added savings.
– Add a squeeze of lemon for a zesty kick.
– Serve with a side of your favorite dipping sauce for variety.
Frequently Asked Questions:
– Can I use other vegetables? Yes! Feel free to mix and match.
– How long do leftovers last? They should stay fresh for about 2-3 days in the fridge.
With these grilled vegetable skewers, you’re sure to impress your guests while keeping things light and healthy!
Grilled Vegetable Skewers
Editor’s Choice
Metal Skewer for Grilling,Kabob Skewer,Flat BBQ Barbecue Skewer,Grilling…

YARRAMATE 16oz/470ml Glass Olive Oil Sprayer for Cooking with Stickers, …

24. Pineapple Salsa

Pineapple salsa is a delightful way to liven up your appetizer spread. This sweet and tangy mix brings a refreshing kick that’s perfect for dipping chips or topping grilled meats. Imagine the vibrant colors and tropical flavors dancing on your taste buds, making every bite a celebration!
This quick recipe takes just 10 minutes to whip up, and it’s a crowd-pleaser. Whether you’re hosting a backyard barbecue or a cozy get-together, pineapple salsa is sure to impress your guests. Plus, it’s a great way to use fresh ingredients that brighten up any dish.
Here’s how to make your own pineapple salsa:
Ingredients:
– 1 cup fresh pineapple, diced
– 1/2 red onion, finely chopped
– 1 jalapeño, minced (seeds removed for less heat)
– Juice of 1 lime
– A handful of cilantro, chopped
Instructions:
1. In a medium bowl, combine the diced pineapple, chopped onion, minced jalapeño, lime juice, and cilantro.
2. Stir everything together until well mixed.
3. Serve immediately with tortilla chips or use it as a zesty topping for grilled fish or chicken!
Want to kick up the heat? Leave some seeds in the jalapeño. This salsa also works wonders as a topping for tacos or grilled shrimp, adding a tropical flair to your favorite dishes.
Nutrition Information:
– Total Fat: 0g
– Sodium: 10mg
– Carbohydrates: 16g
– Protein: 1g
Frequently Asked Questions:
– Can I use canned pineapple? Fresh is best, but canned pineapple works in a pinch.
– How long does it last? Store it in an airtight container in the fridge for 1-2 days.
This pineapple salsa is not just a treat; it’s a bright addition that makes your gatherings feel special. Enjoy the burst of flavor and the smiles it brings!
Did you know pineapple salsa comes together in just 10 minutes and doubles as a color-packed crowd-pleaser? With its sweet-tangy kick, easy mexican food recipes appetizers shine—perfect for chips, tacos, or grilled meats at your next party.
Pineapple Salsa
Editor’s Choice
Bamboo Cutting Boards for Kitchen [Set of 3] Wood Cutting Board for Chop…

Brewin CHEFILOSOPHI Japanese Chef Knife Set 5 PCS with Elegant Red Pakka…
WHYSKO Meal Prep Stainless Steel Mixing Bowl (5-Piece Set) Home, Refrige…
25. Chicken Taquitos

If you’re searching for an appetizer that packs flavor and crunch, look no further than chicken taquitos. These crispy rolls, stuffed with seasoned chicken and melted cheese, are a guaranteed crowd-pleaser. They’re perfect for dipping in salsa or guacamole, making them a fantastic addition to your next gathering. Imagine the satisfying crunch as you bite into each one!
Making chicken taquitos is simple and fun. In about 35 minutes, you can whip up a batch that serves four. Plus, you can easily customize them by adding black beans or corn for extra texture and flavor. And if you want a lighter option, consider baking them instead of frying.
Here’s how to make these delicious appetizers:
Ingredients:
– 2 cups shredded cooked chicken
– 1 cup shredded cheese
– 8 corn tortillas
– Oil for frying
– Salsa for serving
Instructions:
1. In a mixing bowl, combine the shredded chicken and cheese. Make sure everything is well mixed for the best flavor.
2. Warm the corn tortillas in a skillet until they are soft and easy to roll.
3. Spoon the chicken mixture onto each tortilla and roll them tightly.
4. Heat oil in a frying pan over medium heat. Fry the taquitos until they are golden brown and crispy, about 2-3 minutes on each side.
5. Once done, drain them on paper towels and serve hot with salsa on the side.
Tips:
– Bake instead of fry for a healthier twist.
– Choose whole wheat tortillas for a nutritious boost.
– Add spices like cumin or chili powder for extra flavor.
– Store leftovers in an airtight container in the fridge for up to three days.
If you want to make them vegetarian, just swap the chicken for black beans or your favorite veggies. These chicken taquitos are not only easy but also versatile, making them the perfect snack for any occasion!
Chicken Taquitos
Editor’s Choice
CAROTE Nonstick Frying Pan Skillet,Non Stick Granite Fry Pan Egg Pan Ome…
Amazon Basics Silicone Rectangular Baking Mat, Non-Stick Reusable Oven B…
Nordic Ware Microwave Tortilla and Pancake Warmer, 10-Inch Holder – Fits…
26. Mexican Bean Dip

Mexican bean dip is a crowd-pleaser, perfect for your next gathering. This warm, cheesy delight combines layers of refried beans, tangy sour cream, vibrant salsa, and a generous topping of melted cheese. Serve it up with crispy tortilla chips, and watch your guests dive in! It’s simple to make and packed with flavor, making it an ideal choice for any party.
Ready to impress? Here’s how to make this delicious dip in no time:
Recipe Overview:
– Servings: 8
– Prep Time: 10 minutes
– Cook Time: 15 minutes
– Total Time: 25 minutes
– Calories: About 180 per serving
Ingredients:
– 2 cans refried beans
– 2 cups shredded cheese (Mexican blend)
– 1/2 cup sour cream
– 1/2 cup salsa
– Jalapeños for topping
Instructions:
1. Preheat your oven to 350°F (175°C).
2. In a baking dish, layer the refried beans, sour cream, salsa, and cheese.
3. Bake for 15 minutes or until the cheese is bubbly and golden.
4. Sprinkle on jalapeños for an extra kick just before serving.
5. Serve it warm with tortilla chips for dipping.
Feel free to mix it up! You can add layers of guacamole or olives for a twist. This dip also reheats well, so it’s great for make-ahead snacks. Just store it in the fridge for up to 3–4 days and pop it back in the oven when you’re ready to serve.
Nutrition Information:
– Total Fat: 12g
– Sodium: 500mg
– Carbohydrates: 20g
– Protein: 8g
Got questions? Here are some common ones:
– How long does it last? About 3-4 days in the fridge.
– Can I make it vegetarian? Absolutely! Just ensure the cheese and beans are vegetarian-friendly.
This Mexican bean dip is not only easy to make, but it also brings everyone together. So grab your ingredients, and let’s start dipping!
Mexican Bean Dip
Editor’s Choice

DOWAN Casserole Dish, 9×13 Ceramic Baking Dish, Large Lasagna Pan Deep f…
Amazon Grocery, Restaurant Style Tortilla Chips, 20 Oz (Previously Amazo…

Cambom Rotary Cheese Grater Hand Crank Cheese Shredder for Fresh Cheese,…
27. Egg and Chorizo Breakfast Bites

Egg and chorizo breakfast bites are the ultimate crowd-pleaser for your morning gatherings or brunch. These little morsels burst with flavor and are incredibly easy to prepare ahead of time, making your hosting duties a breeze! Imagine the aroma of eggs mingling with spicy chorizo filling your kitchen, enticing your guests as they arrive.
These bites are not only delicious but also nutritious. Each serving offers a balanced mix of protein and flavor, perfect for kick-starting your day. Plus, they’re easily customizable, allowing you to add your favorite veggies or spices. Let’s dive into the recipe so you can whip these up for your next event!
Recipe Overview:
– Servings: 6
– Prep Time: 15 minutes
– Cook Time: 20 minutes
– Total Time: 35 minutes
– Calories: About 150 per serving
Ingredients:
– 6 eggs
– 1/2 cup cooked chorizo
– 1/4 cup shredded cheese
– 1/4 cup diced bell peppers (any color you like!)
– Salt and pepper to taste
Instructions:
1. Preheat your oven to 350°F (175°C).
2. In a mixing bowl, whisk together the eggs, cooked chorizo, cheese, diced peppers, salt, and pepper until combined.
3. Lightly grease a muffin tin to prevent sticking, then pour the egg mixture evenly into the cups.
4. Bake for 15-20 minutes or until the bites puff up and are set in the middle.
5. Allow them to cool for a few minutes before removing from the tin. Serve warm and enjoy!
Feel free to add any leftover veggies, or swap chorizo for turkey sausage for a lighter version. These bites reheat beautifully, making them perfect for meal prep or last-minute entertaining. Just pop them in the microwave for a quick breakfast or snack!
Quick Tips:
– Use leftover vegetables to reduce waste.
– Choose spicy or mild chorizo based on your taste.
– Serve with salsa for an extra kick.
– Store in the fridge for up to 3 days or freeze for later.
Now you have a simple, delightful recipe that will impress your guests and make your brunch unforgettable! Enjoy every bite of these egg and chorizo breakfast bites.
Egg and Chorizo Breakfast Bites
Editor’s Choice

Amazon Basics Nonstick Round Muffin Baking Pan, 12 Cups, Set of 2, Gray,…
Amazon Basics Silicone Rectangular Baking Mat, Non-Stick Reusable Oven B…

Stainless Steel Egg Whisk, Hand Push Rotary Whisk Blender, Versatile Mil…
28. Zucchini and Corn Fritters

Zucchini and corn fritters are a delightful appetizer that adds a burst of flavor to any gathering. These golden, crispy bites are not only light but also incredibly satisfying, making them a hit for dipping or snacking. Your guests will love the crunchy exterior and tender interior, and they’ll keep coming back for more!
Ready to make some? Here’s a quick overview of the recipe:
Recipe Overview:
– Servings: 4
– Prep Time: 15 minutes
– Cook Time: 15 minutes
– Total Time: 30 minutes
– Calories: About 150 per serving
Ingredients:
– 1 cup grated zucchini
– 1 cup corn kernels
– 1/2 cup flour
– 1 egg
– 1 tsp baking powder
– Olive oil for frying
– Salt and pepper to taste
Instructions:
1. Start by mixing the grated zucchini, corn, flour, egg, baking powder, salt, and pepper in a bowl. Make sure everything is well combined!
2. Heat a generous amount of olive oil in a skillet over medium heat. You want enough oil to cover the bottom.
3. Spoon the mixture into the hot oil, flattening each fritter slightly.
4. Cook for about 3-4 minutes on each side or until they turn golden brown and crispy.
5. Transfer the fritters to a plate lined with paper towels to soak up any excess oil. Serve them warm!
For an extra kick, pair your fritters with a tangy yogurt dip. You can also play with flavors by adding herbs like cilantro or spices like cumin to the mix.
Nutrition Information:
– Total Fat: 7g
– Sodium: 100mg
– Carbohydrates: 20g
– Protein: 4g
Frequently Asked Questions:
– Can I bake them instead? Yes, simply bake at 375°F (190°C) until they’re golden brown.
– How long do leftovers last? They stay fresh in the fridge for about 2-3 days.
These zucchini and corn fritters are not only easy to make but also a fantastic way to impress your friends at your next party. Enjoy creating this delicious dish!
Zucchini and Corn Fritters
Editor’s Choice

T-fal Ultimate Hard Anodized Nonstick Fry Pan Set 2 Piece, 10, 12 Inch, …
Umite Chef Mixing Bowls with Airtight Lids Set, 8PCS Stainless Steel Kha…
29. Coconut Lime Shrimp

Coconut lime shrimp are a delightful appetizer that brings a taste of the tropics right to your table. The combination of juicy shrimp with the zesty brightness of lime and the creamy sweetness of coconut makes this dish perfect for summer gatherings or any festive get-together. Imagine serving these vibrant bites at your next party, and watch as your guests savor every morsel!
Making coconut lime shrimp is simple and quick. With just a little preparation, you can whip up this dish in under 30 minutes. It’s not only delicious but also low in calories, making it a guilt-free choice for your appetizer spread. Plus, this recipe is easy to adapt, so feel free to experiment with spices or serve it with your favorite sides.
Here’s how to make coconut lime shrimp:
Ingredients:
– 1 lb shrimp, peeled and deveined
– 1/2 cup coconut milk
– Juice of 2 limes
– 1 tbsp honey
– Salt and pepper, to taste
Instructions:
1. In a mixing bowl, whisk together the coconut milk, lime juice, honey, salt, and pepper.
2. Add the shrimp to the bowl and toss until they are well coated. Let them marinate for at least 10 minutes to absorb the flavors.
3. Heat a skillet over medium-high heat. Cook the shrimp for about 2-3 minutes on each side, or until they turn opaque and are cooked through.
4. Serve the shrimp warm, garnished with lime wedges for an extra burst of flavor.
For a complete meal, consider serving the shrimp over rice or quinoa. Add a sprinkle of fresh cilantro to enhance the flavors even more.
Tips for Serving:
– Use frozen shrimp, ensuring they are thawed before cooking.
– Pair with pineapple salsa for a sweet and tangy contrast.
– Serve alongside a fresh salad for a light and vibrant meal.
– Experiment with spices like chili flakes for an added kick!
These coconut lime shrimp will surely be a hit at your next event, making it feel festive and fun. Enjoy creating this simple yet flavorful dish that everyone will love!
Coconut Lime Shrimp
Editor’s Choice

Maine Man Shrimp Peeler Deveiner Cleaner Tool, 8-Inches, Red

Thai Kitchen Gluten Free Unsweetened Coconut Milk, 13.66 fl oz (Pack of 12)

Zulay Kitchen Metal 2-in-1 Lemon Squeezer – Sturdy Max Extraction Hand J…
Conclusion

These 29 easy Mexican appetizer recipes are designed to impress without overwhelming your schedule. They combine quick preparation with mouthwatering flavors that will keep your guests coming back for more.
From classic guacamole to creative twists like coconut lime shrimp, there’s something for everyone. Embrace the bold flavors of Mexican cuisine and enjoy a stress-free hosting experience with these delightful dishes!
Note: We aim to provide accurate product links, but some may occasionally expire or become unavailable. If this happens, please search directly on Amazon for the product or a suitable alternative.
This post contains Amazon affiliate links, meaning I may earn a small commission if you purchase through my links, at no extra cost to you.
Frequently Asked Questions
What Are Some Quick and Easy Mexican Appetizer Ideas for Busy Hosts?
If you’re short on time but want to impress your guests, consider options like guacamole and tortilla chips, or mini quesadillas. These easy Mexican food recipes appetizers require minimal prep and are always crowd-pleasers. You can also whip up pico de gallo or spicy bean dip in just a few minutes for a delicious spread that will have everyone coming back for more!
Can I Make Traditional Mexican Appetizers Healthier?
Absolutely! You can still enjoy traditional Mexican appetizers while keeping them healthy. For example, use whole-grain tortillas for your nachos or opt for baked instead of fried chips. Incorporating more vegetables into your recipes, like adding spinach to your quesadillas, can also help boost nutrition without sacrificing flavor. The key is to balance taste with healthy ingredients!
What Are Some Simple Party Recipes for a Mexican-Themed Gathering?
For a Mexican-themed gathering, you can’t go wrong with street corn salad, chicken taquitos, and a variety of salsas. These simple party recipes are not only easy to prepare but also full of vibrant flavors that will transport your guests to Mexico. Don’t forget to serve them with a refreshing margarita or horchata to complete the experience!
How Can I Prepare Mexican Party Snacks in Advance?
Planning is key to enjoying your party! Many Mexican party snacks can be made in advance, like bean dip or chili con queso. Prepare your dips a day ahead and store them in the fridge. You can also pre-chop your veggies for salsa and keep them in airtight containers. Just remember to bake or fry any appetizers like empanadas or mini churros right before serving for that fresh-out-of-the-oven taste!
What Are Some Easy Finger Foods for a Mexican Fiesta?
Finger foods are perfect for a Mexican fiesta! Try making stuffed jalapeños, chicken flautas, or cheesy nachos. These easy finger foods are not only fun to eat but also allow guests to mingle without the need for plates. Pair them with a vibrant salsa bar or a selection of dips for a tasty and interactive snack experience!
Related Topics
easy mexican appetizers
quick party snacks
traditional recipes
healthy finger foods
simple appetizer recipes
Mexican party ideas
5-minute appetizers
busy host tips
easy entertaining
flavorful dips
crowd-pleasing snacks
party food ideas